

How To Tie Sageo 下げ緒
A question I commonly get asked in the dojo is what is a Sageo 下げ緒 for and how do you tie one? This is usually after a student has bought their first Iaito and undone the Sageo not realising that they have no idea how to put it back into it original position.
In this post i’m going to break it down into an easy guide so that its never an issue for anyone again.
The first thing you need to do it understand what your working with, the diagram below will outline all of the parts of the Katana and the relevant Japanese terms:
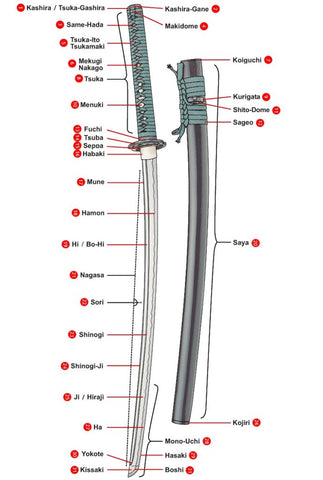
In this post we are going to mainly be concerned with the Kurigata 栗形, Hito Dome 鵐目 and Sageo 下げ緒 but its a good idea to familiarise yourself with all the sword terms.
First establish what type of Sageo you have, certain types of Sageo such as the Shigeuchi Sageo have a loose weave so you dont want to pull them through Hito Dome as it will ruin the Sageo completely.

The Sageo pictured above is a Shigeuchi Sageo but it has been passed through wider than usual Hito Dome 鵐目.
Care should be taken with your Sageo if you are unsure what type yours is, most are a slightly thicker weave cotton Sageo similar to Tsuka Ito (Handle Cord) called Kakucho Sageo like the one pictured below.

The more expensive traditional Sageo are weaved out of expensive silks and cost £60+ per Sageo so you certainly would not want to damage them during fitting. You can get cheaper satin equivalents that look similar to the more expensive silk variants but much of its personal preference. If you want to know what your Sageo is made out of you can perform a burn test, the colour of the flame will tell you what it is comprised of but we will go into that in more detail in a later post.
So what exactly is a Sageo used for? A Sageo is a cord that is used to keep your Saya (Sheath) attached to your Obi (Belt), This provides the swordsman with enough movement to keep the Saya attached to the Obi but not locked in a position where it restricts body movement when he needs to draw the sword. It also serves the practical purpose of stopping your Saya from moving freely around the waist and getting in the way of your movement or leaving it on the ground behind you when you move at any speed.
You should tie the Sageo on the Obi with enough length to extend the left arm out while holding the Saya so that the Kojiri of the Saya is in the Obi, This is especially important for Taihenjutsu should you need to roll or leap out of the way as you need to be able to reposition the Saya so that you are not rolling over it or landing directly on it. The lower back needs to be completely clear of the Saya.
Its important to mention that you should not be able to bring the Saya behind the back, the Sageo should start to pull on the Obi once it starts to reach the flat of the lower back on the left hand side, if not the Sageo needs tightening up.
The traditional way of tying the Sageo to the Obi is using a single or double loop with the Sageo passed through to secure the loop in place on the Obi like so:

Find both ends of the Sageo and and hold the ends together, you should have the Kurigata of the Saya positioned right in the middle of the Sageo so that its equal in length. Take about 6-8 inches of Sageo and fold over the finger and pass the loop under your Obi on the right hand side of your hip.
So that a loop is exposed from the top of the Obi like this:

If you imagine my forefinger is the Obi the loop should be exposed from the top, then take the two ends of the Sageo and pass them through the loop like so:

This loop can then be repeated again and the end of the Sageo tucked into the Obi, It shouldnt be tied in a fixed knot in case you need to release it quickly.

Thats how the Sageo should be tied to the Obi but how about when your not training and its on the Kake?
This is a topic of dispute to some extent as the best way you can tie your Sageo without damaging it is not to really tie it at all, The complex looping and knotting of the Sageo tends to stretch and damage the Sageo so the way you see most Sageo tied when you buy them is actually considered detrimental to the Sageo, Tied in the manner shown below:

When you use your Katana your first step should be untying the Sageo and tying a simple loop knot close to the Kurigata, like this:

To form a knot, this helps to keep the Sageo together and stop the Kurigata and Hito Dome from sliding about when your using the Katana.

Although it may not seem that important to tie this knot it is essential for safety, if the Sageo snags whilst you are drawing the Katana all sorts of accidents can happen and you could even end up stabbing yourself with the Kissaki of your Katana.
When you are finished training with you sword you should wrap the Sageo in a simple flat manner, I have provided two examples below.

This is the easiest way to tie the Sageo by simply wrapping it under the Kurigata.

This is a more traditional way of wrapping the Saya whilst it is stored on a Kake (Stand). The Sageo is run along the length of the Saya and wrapped approximately three quarters of the way down the Saya by the Kojiri.
I would personally advise tying your Sageo using a method that wont damage your Sageo but I do understand that the simple manners of tying it just dont have the same aesthetic appeal as the more complex styles.
Which leads me on to the final section of this post, How to tie the Sageo in the usual way for display.
Im going to start right from the beginning to avoid any confusion so i have removed everything from the Kurigata of my Saya.

The first thing to do before you even start thinking about tying the Sageo is to get a sheet of A4 paper, some scissors and a pencil.
Take the A4 paper and cut a 4cm square, then take the paper and tightly fold it around one end of the Sageo, keep in mind the inner width of the Hito Dome when your wrapping the Sageo as you are going to pass the folded paper through it, this stops the strands at the end of the Sageo from snagging.

Paper wrapped around one end of the Sageo.

Pass the end of the Sageo through the front of the Hito Dome.

Pass the Sageo through the Kurigata with the back of the Hito Dome facing the Kurigata.

Pass the Sageo though the Kurigata until you find the middle ensuring that the Sageo does not snag on the inside of the Kurigata.

Take the paper wrapped end of the Sageo and pass it through the Hito Dome the other way this time, so from the back of the Hito Dome to the front. Be sure to check that you are placing the Hito Dome on the right way up on the Sageo and that the Sageo is not twisted otherwise you will have to remove it and start again.

Once both Hito Dome are on the Sageo in the correct position then remove the paper tip it’s no longer needed.

Find the middle of the Sageo again this time being careful not to snag the Sageo on any shap edges that may be present on the inside of the Hito Dome. Carefully work it through feeling for any snags that may pull threads on the Sageo.

Once you have found the middle of the Sageo lay the left hand side over the right to form a cross.

Take the right hand side of the Sageo and place under the Saya.

Fold the right hand side of the Sageo and place under the first loop formed by the Kurigata.

Repeat the same steps on the left side of the Kurigata.

So that you have two loops either side as demonstrated in the picture above.

Now take the Sageo on the right hand side of the Kurigata and fold it to go back under the Saya to form another loop. Ensure their are no twists in the Sageo on the Ura side of the Saya.

Like so.

Then bring the Sageo back over the top of the Saya to form another loop in the same way as the first loop.

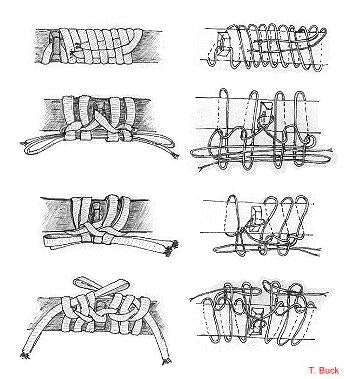
Repeat this process of folding, drawing the Sageo under the Saya and then looping over until you have six loops, three either side of the Kurigata.

Place the pencil through the six loops and level out.

Start tightening the Sageo from the Kurigata outwards, I started from the Kurigata tightening the right side first. The pencil stops you pulling the Sageo through the loops whilst tightening.

Follow the path of the Sageo whilst tightening but leave enough space to pass the ends of the Sageo through the loops.

Once you have tightened the right side and left enough space to pass the Sageo through the loops then tighten the left side in the same way.

Once the Sageo has been tightened enough, fold the length of Sageo on the right and pass through the loops.

Use the pencil to carefully push the folded Sageo through the loops.

Make sure the Sageo is not twisted and is sitting flat inside the loops.

Remove the pencil.

Fold the length of Sageo on the left and pass through the loops.

Use the pencil to assist in passing the folded Sageo through the loops.

Remove the pencil.

Start tightening from the Kurigata outwards again.

Once again i tightened the Sageo on the right side of the Kurigata and then the left side.

Level out either side of the Sageo and flatten down and your finished.
Their is a huge variety of ways to tie the Sageo on your Katana but this probably the most common form that people ask about, some other examples are:

We hope that you find this post helpful and have gained a better understanding of how to use and tie the Sageo.